The trenches area ready, but the concrete pour gets postponed due to bad Weather (26 Nov 2005)
For the last 2-3 weeks we continued with the form work, adding "boxes" of re-inforced steel (reo) trenching mesh inside each of the trenches. Having never done this kind of stuff, there were a whole lot of things I learned in the process (see "tips" at end of this posting - they're pretty technical and may bore the general reader)
Unfortunately, luck was not on my side. After literally MONTHS of digging in very dry weather (which, by the way, dries up the clay and makes it hard as rock!!), and then rushing up to put the formwork in, the weather turned and 'rained down' on my plans!! As you can see from the photos, a significant amount of rain fell and flooded the trenches with water. This is a significant problem, since the concrete would NEVER set right were we to pout in like this. Now we need to wait for dry weather to dry our trenches to a reasonable level (moist is ok; flooded is not), before we go ahead with the concrete pour of the foundations. I guess now it is a matter of hoping and waiting for better weather, wait for trenches to dry, and THEN organise the concrete pour.
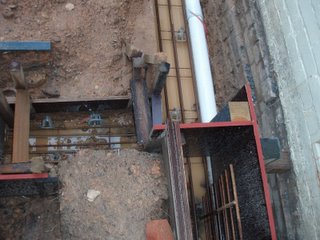
The water fell on all trenches and flooded them.
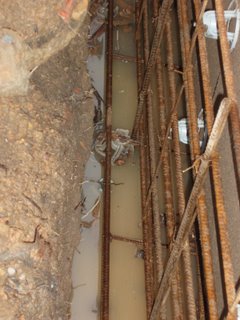
More flooding of the trenches - what a pain!!
TIPS FOR PREPARING THE TRENCHES WITH REO
Unfortunately, luck was not on my side. After literally MONTHS of digging in very dry weather (which, by the way, dries up the clay and makes it hard as rock!!), and then rushing up to put the formwork in, the weather turned and 'rained down' on my plans!! As you can see from the photos, a significant amount of rain fell and flooded the trenches with water. This is a significant problem, since the concrete would NEVER set right were we to pout in like this. Now we need to wait for dry weather to dry our trenches to a reasonable level (moist is ok; flooded is not), before we go ahead with the concrete pour of the foundations. I guess now it is a matter of hoping and waiting for better weather, wait for trenches to dry, and THEN organise the concrete pour.

The water fell on all trenches and flooded them.

More flooding of the trenches - what a pain!!
TIPS FOR PREPARING THE TRENCHES WITH REO
- Because concrete has compression strength but not tensile strength (According to The Concrete Producer's newsletter, "Concrete is usually assumed to be about 10% as strong in tension as it is in compression"), simply pouring concrete would not build solid foundations. If you're confused with the terms compression and tensile strenght, they just mean that although concrete is a very strong compund, it can bend easily. If I laid foundations with just concrete, and it bent over time, the bends wil eventually turn into cracks. For this reason, putting re-inforced steel (reo) inside the concrete structures makes sense, as it ensures that the foundations are as solid as they need to be and keeps their shape intact over time.
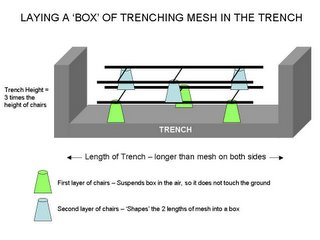
- To reinforce the concrete foundations, one makes a long 'box' of reo to lay right in the middle of the concrete structures. To make 'boxes' of reo one uses 3 materials: (1) tie-wire - which is wire that is strong, but easy to work with; (2) Trenching mesh , which is two long bars of reo with smaller horizontal bars at regular intervals - it looks kind of like small but very long steel ladder; and (3) plastic 'chairs' , which are cones of plastic with indentations to allow you to place between different lengths of reo and let them 'sit right' (thus the name)
- Once you have your materials, the first thing to do is cut the reo to the right lengths. You will usually want to leave a small gap between the ends of the trench and the start of the reo box. The reason for this is that after your pour the concrete, you don't want the reo to be in contact with air at all. When this happens, Rain and humidity will eventually oxidise the reoand cause 'concrete rot' in your foundation, compromising its structural integrity .
- So you've cut down the lengths of reo, and want to make the boxes now, laying them inside the trench. When you purchased the plastic chairs, you should realize that they come in a variety of sizes, and you need to choose the size that will allow the reo to be evenly distributed between the bottom of the foundation, the bottom of the reo box, the top of the reo box and the top of the trench. You put chairs between two lengths of reo at regular intervals (every 2 horizontal bars, on alternating sides so that it becomes a stable reo structure), and then you put some chairs on the ground on the same configuration, and lay the 'box' on top of it
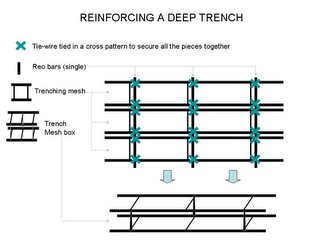
- For trenches that are really deep (see second picture above), you can lay a standard box at the bottom of the trench, then lay a perpendicular, single mesh to hold the rest together. To make the vertical mesh, you cut 3 lengths of single reo bars to the height of the area you need to cover; lay 3 lengths of reo (cut to the width of the area - ie. how long this deeper trench is); and use tie-wire to tie the pieces together at the places they intersect.
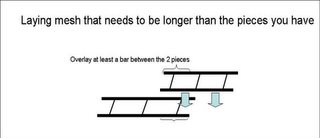
- If the lengths of reo you purchased are not long enough for some of the trenches (as happened to me with the one that goes all along the house), you need to overlay two boxes one after the other. When doing this, make sure there is 1 "bar" of overlap between the two contiguous boxes. Otherwise, you will have a weak point at the joint of these 2 pieces, and the foundation may 'bend' at this point later on. When Meshes join at 90 degree angles you also want some overlap.
- Laying the boxes in the trench: when you do this for the first time, your intuition will tell you to construct the boxes in a spacious, clean area away from the construction site, and then come in and 'drop' the boxes in the right place. Don't do that! Surprisingly, it is a LOT easier to lay the 2 pieces of trenching mesh loosely inside the trench first (with the chairs at roughly the right intervals), and then little by little start putting tie wire across the structure. The reason for this is that as you put the tie wire, the structure starts becoming REALLY solid by and of itself. You can then even walk on top of the box (but do it on the thicker, length-wise bars; I broke a couple of horizontals by walking on them). The last step is simply to adjust the location of the chairs that you placed underneath the box so that the structure is held in place in a stable, solid manner.
One last thing - a lot of the "tips" were VERY hard to describe!! If you want a better explanation leave me a comment to this post, which part you want to understand better, and I'll try to draw a diagram of what I mean!!!


0 Comments:
Post a Comment
<< Home